WAVESHAPER™ Frequency Instrument +
PHOTON TORCH XL™ -
Operating Instructions
DISCLAIMER: Your PHOTON TORCH XL™ is to be used "FOR EXPERIMENTAL PURPOSES ONLY".
By law, I must tell you that at NO time should the PHOTON TORCH XL&8482; be used to replace PROPER Medical Treatment, or be considered as a Replacement for PROPER Physician Care and for ALL Medical Conditions consult your Physician FIRST, before using this Experimental Biophoton Device.
NOTE: Please follow these Steps CAREFULLY, thus ensuring that EFFICACIOUS Results and EFFICIENT Operation are obtained, while using your PHOTON TORCH XL™.
Preliminary Comments:
1. Your PHOTON TORCH XL™ can radiate a SOLID/CONTINUOUS Red, Blue, Green or Yellow/Amber Light Beam, when you're operating in the SOLID/CONTINUOUS Beam Mode. This SOLID/CONTINUOUS Red, Blue, Green or Yellow/Amber Light Beam can then be shined onto a SPECIFIC Acupuncture Point, Trigger (center of pain) Point &/or Reflex Point or be used to "light paint" a LARGE affected Body Area (i.e. - Skin, Acne, Joints, Involved Muscles, Tumors, etc.).
2. Your PHOTON TORCH XL™ can also radiate a PULSED (appears solid above 50 Hz./pps.) Red, Blue, Green or Yellow/Amber Light Beam at a SPECIFIC Pulse Rate/Frequency, using your WAVESHAPER™ Frequency Instrument, while operating in the Square Wave Mode. This PULSED (appears solid above 50 Hz./pps.) Red, Blue, Green or Yellow/Amber Light Beam can also be shined onto a SPECIFIC Acupuncture Point, Trigger (center of pain) Point &/or Reflex Point or onto a LARGE affected Body Area (i.e. - Skin, Acne, Joints, Involved Muscles, Tumors, etc.).
NOTE: The Red, Blue, Green or Yellow/Amber Light Beam will appear SOLID/CONTINUOUS, until the BNC Cable is connected (see Operating Steps 1 & 2), your WAVESHAPER™ Frequency Instrument is "ON" (see Operating Step 5) and the Black Rocker Switch is in the "PULSED" Position (see Operating Step 9c), but then this "PULSED" Red, Blue, Green or Yellow/Amber Light Beam will appear SOLID/CONTINUOUS anyhow, when operating above 50 pps./Hz..
3. Operating Steps 1 - 6, can be ELIMINATED, if ALREADY done, when your PHOTON TORCH XL™ is being operated with your WAVESHAPER™ Frequency Instrument on a REGULAR basis in the PULSED Light Beam Mode.
4. Operating Steps 1-3 don't NEED to be done, and Steps 4 & 6 can be ELIMINATED, if ALREADY done, when your PHOTON TORCH XL™ is being operated on a REGULAR basis in the SOLID Light Beam Mode.
Operating Steps:
NOTE: Read and become familiar with WAVESHAPER™ Frequency Instrument - Operating Instructions, before proceeding with Operating Steps 7, 8, 9, 10a and 10b, when operating in the PULSED Light Beam Mode.
1. Push the A.C. Power Plug, which is mounted on the wall-type D.C. Power Supply, that comes with your PHOTON TORCH XL™ Console Unit, plus the A.C. Plug/Wire connected to your WAVESHAPER™ Frequency Instrument, into a HIGH Quality Surge Suppressor Power Strip (i.e.- Tripp Lite Isobar 4 Ultra, 6 Ultra or 8 Ultra - 600 joules or above), thus ensuring SAFE and EFFICIENT Operation.
2. Push the 2.1 mm D.C. Power Plug, which is connected to the other end of the Cable of your wall-type D.C. Power Supply, into the 2.1 mm D.C. Power Jack, which is mounted on the Rear Panel of your PHOTON TORCH XL™ Console Unit and which is labeled, "DC IN".
3. Push the BNC Plug, which is connected on one end of a 3 ft. Cable, that has another BNC Plug connected at the opposite end, onto the BNC Jack, that's mounted on the Front Panel (lower middle) of your WAVESHAPER™ Frequency Instrument, and that's labeled "TTL/CMOS OUTPUT".
4. Push the other BNC Plug, which is connected to the opposite end of this same 3 ft. Cable, into the BNC Jack, which is mounted on the Rear Panel (left side) of the Console Unit of your PHOTON TORCH XL™, and which is labeled "PULSE IN".
5. Push the right-angled 1/4" Plug, which is connected to one end of the 10 ft. Coiled Cable, and which has an RCA Plug connected to the opposite end, into the 1/4" Jack, which is mounted on the Front Panel of the Console Unit of your PHOTON TORCH XL™, and which is labeled "OUTPUT".
6. Push the red right-angled RCA Plug, which is connected to opposite end of the 10 ft. Coiled Cable, and which has the right-angle 1/4" Plug now connected into the 1/4" "OUTPUT" Jack, into the RCA Jack, that's mounted on the End-Cap of the Metal Biophoton Tool of your PHOTON TORCH XL™.
NOTE: You should KEEP the RCA Plug plugged into the End-Cap of your Biophoton Tool as much as possible, thus ELIMINATING the eventual LOSE of connection with the RCA Jack.
Also if and when your Biophoton Tool is NOT being used, you should push it into the Metal Clip near the end of the Rubber Sleeve (closest to Lens/Head).
7. Push the POWER Button (lower left corner) on your WAVESHAPER™ Frequency 'IN' once to turn it's Power "ON".
8. Press the WAVE Button (upper right corner - display) until the Square Waveform (stairstep) appears.
NOTE: Please notice that TTL also appears, whenever the Square Waveform (stairstep) is selected.
9. Press the VALID Buttons in sequence on the Touchpad for the SPECIFIC Pulse Rate/Frequency, that you're needing, and right afterwards press either the kHz. or Hz. Button as required.
NOTE: The large Knob (upper right corner) can also be turned either clockwise (up) or counter-clockwise (down) and/or the Arrow Buttons can be pressed either left (down) or right (up) to change the Frequency in increments.
10a. Press the SHIFT Button and then right afterwards press the DUTY (7) Button, until the DUTY LED appears.
10b. Press the VALID Buttons for the Duty Cycle of 80% on the Touchpad, which is the MAXIMUM Seting in sequence and then right afterwards press the Hz./% Button.
11a. Rock the Black Rocker Switch (right side) 'UP' to the "SOLID" Position, if you want to operate your PHOTON TORCH XL™ in the SOLID/CONTINUOUS Red, Blue, Green or Yellow/Amber Light Beam Mode.
11b. Turn the POWER Control/Switch (center/middle) clockwise, until a snapping sound is heard, to turn the Power "ON", and then keep turning the Knob to the desired Light Beam Level (30 and above - dialplate).
NOTE: You should now be ABLE to see the SOLID/CONTINUOUS Red, Blue, Green or Yellow/Amber Light Beam shining from the Lens/Head of the Metal Biophoton Tool, which is connected to the Console Unit of your PHOTON TORCH XL™.
Please check your Cables, Connectors and Fuse. If they seem to be OKAY, please call me (Tom) at 614/237-2590 or 614/237-2590, or please email me at tharrels@hotmail.com, if you don't see a SOLID/CONTINUOUS Red, Blue, Green or Yellow/Amber Light Beam shining from the Lens/Head of the Metal Biophoton Tool.
11c. Rock the Black Rocker Switch (right side) 'DOWN' to the "PULSED" Position, if you want to operate your PHOTON TORCH XL™ in the PULSED Red, Blue, Green or Yellow/Amber Light Beam Mode.
11d. Turn the POWER Control/Switch (center/middle) clockwise, until a snapping sound is heard, to turn the Power "ON".
NOTE: This POWER Control/Switch does NOT control the Light Beam Level, whenever you're operating in the "PULSED" Light Beam Mode.
You should now be ABLE to see the PULSED (appears solid above 50 Hz./pps.) Red, Blue, Green or Yellow/Amber Light Beam shining from the Lens/Head of the Metal Biophoton Tool of your PHOTON TORCH XL™, and if you do, then you can proceed to Step 8a, 8b or 8c.
The PULSED Red, Blue, Green or Yellow/Amber Light Beam appears solid above 50 Hz./pps. and won't be as BRIGHT as it is, whenever you're operating your PHOTON TORCH XL™ in the SOLID/CONTINUOUS Light Beam Mode, when your WAVESHAPER™ Frequency Instrument is operated at an 80% Duty Cycle (operates like 1/2 power), when it's in the Square Wave Mode.
If a PULSED Red, Blue, Green or Yellow/Amber Light Beam, which appears solid above 50 Hz./pps., is NOT shining from the Lens/Head of the Metal Biophoton Tool, then you'll NEED to check your Cables, Connectors and Fuse. If they seem to be OKAY, then please call me (Tom) at 614/237-2590 or email me at tharrels@hotmail.com.
12a. Hold your PHOTON TORCH XL™ like a Pen and shine the SOLID or PULSED Red, Blue, Green or Yellow/Amber Light Beam, which appears solid above 50 Hz./pps., DIRECTLY onto a SPECIFIC Acupuncture Point, Trigger (center of pain) Point, &/or Reflex Point at a Distance of NO MORE than 1/4" above the Skin or, BETTER yet, place the Lens/Head of the Metal Biophoton Tool NEXT to the Skin and move it in a SLOW CLOCKWISE Circle, starting about 1" from the Acupuncture Point, Reflex Point or Trigger (center of pain) Point and moving towards the center and then holding the tip in place there for 2-5 mins.
NOTE: The Lens/Head of the Metal Biophoton Tool can also be applied with a GENTLE Pressure onto an Acupuncture Point or Reflex Point for 30-90 secs. to provide a ROUGH Diagnostic Technique, since the degree of SENSITIVITY of the Acupuncture or Reflex Point will give a relative evaluation of the status of your Health PROBLEM. You'll find that as the Condition of your Health PROBLEM IMPROVES, the Acupuncture or Reflex Point SENSITIVITY will be REDUCED!
If your Hand/Wrist gets TIRED, holding your PHOTON TORCH XL™ in the "Pen" Position, then curl your Fingers around the Case/Handle, while it's resting on the Base of the Palm of your Hand underneath in this Handhold Position. You may want to use the Handhold Position indefinitely, instead of using the "Pen" Position, if your Hand is MORE COMFORTABLE.
12b. "Light paint" a Medium (more than 1/4") Body Area (i.e. - Skin, Acne, Joints, Involved Muscles, Tumors, etc.) by tracing 1" CLOCKWISE Circles with the SOLID/CONTINUOUS or PULSED (appears solid above 50 Hz./pps.) Red, Blue, Green or Yellow/Amber Light Beam.
NOTE: The Rate, that you use, when you trace these Circles, can be varied from SLOW to VERY RAPID. CHRONIC Condtions usually respond BEST to a RAPID Rate, whereas ACUTE Condtions usually respond BEST to a SLOWER Rate.
12c. Hold the the PHOTON TORCH XL™ like a Pen and shine the SOLID/CONTINUOUS or PULSED (appears solid above 50 Hz./pps.) Red, Blue, Green or Yellow/Amber Light Beam DIRECTLY onto the MAJOR PAIN POINT #2 (right hand/forefinger/fingernail/lower left corner - see below).
NOTE: Please follow this Step, if you want to treat your Body with a SPECIFIC Pulse Rate/Frequency and there isn't a SPECIFIC Acupuncture Point, Trigger Point and/or Pain Area involved.
Please see the SPECIFIC Biophoton Light Therapy Treatment Instructions for the Frequency & Duration Of Treatments.
If your Hand/Wrist gets TIRED, holding your PHOTON TORCH XL™ in the "Pen" Position, curl your Fingers around the Case/Handle, while it's resting on the Base of the Palm of your Hand underneath. If your Hand is MORE COMFORTABLE, you may want to use the Handhold Position indefinitely, instead of using the "Pen" Position.
MAJOR PAIN POINTS
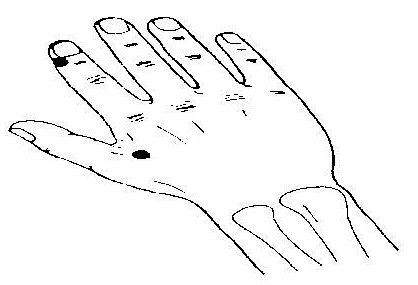
< No. 2 - A quarter of a finger proximal and towards the thumb from the thumb side of the base of the nail of the index finger.
< No.1 - On the highest point of the hill formed when the straight thumb is pressed against the side of the index finger.
|
13. Perform the above Procedure(s) on each Point/Area, that NEEDS to be treated, for 1-3 minutes.
NOTE: These Procedures can be done up to 3 times per day, and each Point/Area should receive a MAXIMUM Treatment Time per Day of about 10 mins. (acute conditions) and about 15 mins. (chronic conditions).
If you're using MORE than one Pulse Rate/Frequency, then divide the TOTAL Treatment Time of 10 mins. (acute conditions) and 15 mins. (chronic conditions) by the number of Pulse Rates/Frequencies to obtain the amount of Time for each Pulse Rate/Frequency. Also see Frequency & Duration Of Treatments.
The Brightness Level of the Red, Blue, Green or Yellow/Amber Light Beam will DROP about 20% and STABILIZE after 5 mins. of operation, because the Luxeon 3 Watt L.E.D. operates at a HIGH Temperature Level.
14a. Turn the POWER Control/Switch, counter-clockwise until the Red Pilot Light is "OFF", when you're FINISHED, using your PHOTON TORCH XL™ in the SOLID/CONTINUOUS Red, Blue, Green or Yellow/Amber Light Beam Mode.
NOTE: The ULTRA HIGH-Intensity L.E.D. in the Metal Biophoton Tool of your PHOTON TORCH XL™ draws up to 700 ma. of Current, and so you NEED to turn the POWER Control/Switch to the "OFF" Position, so that you PREVENT an early BREAKDOWN of the 2 - Power Supplies, which power the Console Unit of your PHOTON TORCH XL™,.
14b. Turn the POWER Control/Switch, counter-clockwise to the "OFF" Position, until the Red Pilot Light is "OFF", when you're FINISHED, using your PHOTON TORCH XL™ in the PULSED (appears solid above 50 Hz./pps.) Red, Blue, Green or SOLID Yellow/Amber Light Beam Mode.
15. Push the POWER Button (lower left corner) on your WAVESHAPER™ Frequency Instrument 'IN' again to turn it's Power "OFF", if the Treatment Session has been COMPLETED.
Final Comments:
1. Continue your EXPERIMENTAL Biophoton Light Therapy Treatments until you've obtained the DESIRED Results.
2. DISCONTINUE &/or MODIFY the EXPERIMENTAL Light Treatment with your PHOTON TORCH XL™ if the DETOXIFICATION Process comes TOO UNCOMFORTABLE, but as SOON as possible (1-2 days), please continue your EXPERIMENTAL Light Treatment.
3. Try using the Pulse Rate/Frequency of 3300 pps./Hz., if you want to REPLACE the "SOLID" Postion, or if you want to experiment with a NEW Pulse Rate/Frequency.
4. Try using the Pulse Rate/Frequency of 5.9 & 18 pps./Hz. (scar tissue &/or adhesions) for Acupuncture Energy Field Disturbance, if you haven't been obtaining the DESIRED Results.
5. Try using the Pulse Rates/Frequencies of 10, 47, 266, 292 &/or 727.5 pps./Hz., if you haven't been obtaining the DESIRED Results. You might also want to try using the Bible Healing Codes/Pulse Rates/Frequencies.
6. Monitor the duration of the EXPERIMENTAL Biophoton Light Therapy Treatments, when you're using your PHOTON TORCH XL™, with a Digital Timer (i.e. - Radio Shack No. 63-878).
7. Clean the Lens on the Head of the Metal Biophoton Tool of your PHOTON TORCH XL™ once per week, or as NEEDED, using a 3M Lens Cleaning Cloth, thus ENSURING that the Red, Blue, Green or Yellow/Amber Light Beam is being emitted at it's MAXIMUM Output.
Revised 5/9/10