DISCLAIMER: Your PHOTON TORCH IR™ is to be used "FOR EXPERIMENTAL PURPOSES ONLY".
By law, I must tell you that at NO time should the PHOTON TORCH IR™ be used to replace PROPER Medical Treatment, or be considered as a Replacement for PROPER Physician Care and for ALL Medical Conditions consult your Physician FIRST, before using this Experimental Biophoton Tool, unless, of course, you are a physician.
1. Your PHOTON TORCH IR™ radiates a Hi or LO SOLID or HI PULSE (8.5 pps) INFRARED (850 nm - invisible) Light Beam, being powered by 2 - 'AA' Alkaline Batteries, which are contained inside it's Case/Handle. This HI or LO SOLID or PULSE (8.5 pps) INFRARED (850 nm - invisible) Light Beam can then be shined onto a SPECIFIC Acupuncture Point, Trigger (center of pain) Point &/or Reflex Point or be used to "light paint" a LARGE affected Body Area (i.e. - Skin, Joints, Involved Muscles, Tumors, etc.).
2. You can see the LED glow red, if you look into and inside of the lens at an angle. Do NOT look DIRECTLY into the front of the lens, because your eye will be DAMAGED!! You can also observe the glow of the IR LED on the screen of a digital still and/or video camera, when your PHOTON TORCH IR is pointed towards the lens of this camera, while operating normally.
3.The INFRARED (850 nm - invisible) Light Beam of your PHOTON TORCH IR™ can be adjusted from flood-to-spot by pulling the head forward and spot-to-flood by pulling the head backward.
4. Please read and follow the following Steps 1-4, plus the Final Comments CAREFULLY to ENSURE EFFICIENT Operation of and EFFICACIOUS Results from your PHOTON TORCH IR™.
1 (a) Pushing the Black Rubber Button lightly ONCE on the end of the Case/Handle of your PHOTON TORCH IR™ will turn "ON" the INFRARED (850nm - invisible) Light Beam in the HI SOLID mode.
(b) Pushing the Black Rubber Button lightly again will turn "ON" the INFRARED (850 nm - invisible) Light Beam in the LO SOLID mode.
(c) Pushing the Black Rubber Button lightly a 3rd time will turn "ON" the INFRARED (850 nm - invisible) Light Beam in the HI PULSE (8.5 pps) mode.
2a. When treating a SMALL area, such as a Acupuncture Point, pull the Head forward, until it STOPS, to project a SMALL Spot INFRARED (850 nm - invisible) Light Beam. Also, push the Black Rubber Button until you see (Preliminary Comments - Step 2) the LO INFRARED (850 nm - invisible) Light Beam. Hold your PHOTON TORCH IR™ like a Pen, gripping around the Case/Handle near the Head, when you want to shine the INFRARED (850 nm - invisible) Light Beam DIRECTLY onto a SPECIFIC Acupuncture Point, Trigger (center of pain) Point, &/or Reflex Point at a Distance of NO MORE than 1/4" above the Skin or, BETTER yet, place the end of the tip of of your PHOTON TORCH IR™ NEXT to the Skin and move the Head in a SLOW CLOCKWISE Circle, starting about 1" from the Acupuncture Point, Reflex Point or Trigger (center of pain) Point, moving towards the center and lastly holding the Head on this Point for 1-3 mins..
NOTE: If your Hand/Wrist gets TIRED, holding your PHOTON TORCH IR™ in the "Pen" Position, curl your Fingers around the Case/Handle, while it's resting on the Base of the Palm of your Hand underneath. If your Hand is MORE COMFORTABLE in this NEW Handhold Position, you may want to use it indefinitely, instead of using the "Pen" Position.
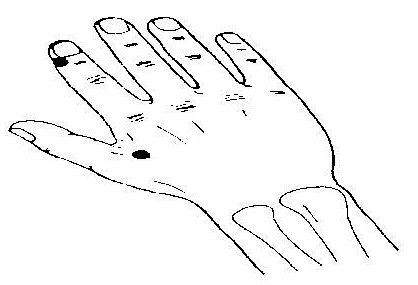
MAJOR PAIN POINTS
< No. 2 - A quarter of a finger proximal and towards the thumb from the thumb side of the base of the nail of the index finger.
< No.1 - On the highest point of the hill formed when the straight thumb is pressed against the side of the index finger. |
2b. When treating a LARGE area, pull the Head backward, until it STOPS, to project a WIDE INFRARED (850 nm - invisible) Light Beam. Also, push the Black Rubber Button until you see (Preliminary Comments - Step 2) the HI INFRARED (850 nm - invisible) Light Beam. Then "light paint" the LARGE (more than 1/2") affected Body Area (i.e. - Skin, Joints, Involved Muscles, Tumors, etc.) by tracing 1" CLOCKWISE Circles with the INFRARED (850 nm - invisible) Light Beam. Continue to "light paint" the LARGE Area for 3-5 mins..
NOTE: The Rate, that you use, when you trace these Circles, can be varied from SLOW to VERY RAPID. CHRONIC Condtions usually respond BEST to a RAPID Rate, whereas ACUTE Condtions usually respond BEST to a SLOWER Rate. If the DESIRED healing results are NOT obtained, after 3-5 days, push the Black Rubber Button until you see (Preliminary Comments - Step 2) the HI PULSE (8.5 pps) Light Beam and use this Mode for the SAME amount of time to obtain the DESIRED healing results.
Please see the SPECIFIC Biophoton Light Therapy Treatment Instructions for the Frequency & Duration Of Treatments.
3. Perform this Procedure on each Point/Area, that NEEDS to be treated, for 1-3 minutes.
NOTE: This Procedure can be done up to 3 times per day, and each Point/Area should receive a MAXIMUM Treatment Time per Day of 3 mins. (acute conditions) and 5 mins. (chronic conditions).
4. When you're FINISHED using your PHOTON TORCH IR™ in the SOLID/CONTINUOUS INFRARED (850 nm - invisible) Light Beam Mode, push the Black Rubber Button ONCE on the end of the Case/Handle of your PHOTON TORCH IR™ to turn the INFRARED (850 nm - invisible) Light Beam "OFF".
NOTE: The 3 Watt ColdfusionX L.E.D. in your PHOTON TORCH IR™ draws 700 ma. of Current, and so you NEED to turn the INFRARED (850 nm - invisible) Light Beam "OFF" to CONSERVE the Energy of the 2 - 'AA' Alkaline Batteries, which are inside it's Case/Handle.
1. Continue your EXPERIMENTAL Biophoton Light Therapy Treatments until you've obtained the DESIRED Results.
2. DISCONTINUE &/or MODIFY the EXPERIMENTAL Light Treatment with your PHOTON TORCH IR™, if DETOXIFICATION becomes TOO UNCOMFORTABLE, but then just as SOON as possible (1-2 days), please continue your EXPERIMENTAL Light Treatment.
3. Monitor the duration of the EXPERIMENTAL Biophoton Light Therapy Treatments, when you're using your PHOTON TORCH IR™ with a Digital Timer (i.e. - Radio Shack No. 63-878).
4. Clean the Lens on the Head of your PHOTON TORCH IR™ once per week, or as NEEDED, using a 3M Lens Cleaning Cloth, thus ENSURING that the INFRARED (850nm - invisible) Light Beam is being emitted at it's MAXIMUM Output.
5a. Please REMOVE the end cap and the EXPIRED original 'AA' Alkaline Batteries.
5b. Insert the POSITIVE end FIRST, observing the CORRECT Polarity with either 2 - 'AA' Alkaline, 'AA' Lithium-Ion, 'AA' Nickel-Cadium or 'AA' Nickel Metal Hydride Batteries (do NOT MIX types).
6. Do NOT look DIRECTLY into or view DIRECTLY with Optical Instruments the INFRARED (850nm - invisible) Light Beam from your PHOTON TORCH IR™ for ANY amount of time, thus ENSURING that there will NOT be DAMAGE to your Eyes!!
7. Most definitely do NOT allow a child to operate your PHOTON TORCH IR™, unless he/she is SUPERVISED by an Adult!